Build your first Web App
Build a Responsive Web App
1 Introduction
This guide will help you gain an understanding of the key features and components of Stack9 using a hands-on demonstration of the system.
1.1 Getting to know Stack9
Stack9 exists of 2 components or websites: a front-end application that your end-users will see and interact with, and a back-office console application where you will configure and build the application. Both are browser-based.
In this guide you will learn how to add an entity to your Domain Model (a visual model that describes your app’s information or data in an abstract way). You will also get an understanding of how the Query Library allows you to build a toolbox of queries using Connectors between your data and the screens on it which that data is presented.
You will also set up Modules that will allow you to browse the data in your application via Screens, as well as validate information you capture using Automations. Lastly you will create a Document Template to allow you to export data in a user-friendly manner.
Lastly you will use the companion front-end application to browse the changes you made and create, update and print information in your application.
2 Prerequisites
You will need to have the following in place before continuing:
- Browser access to a running Stack9 console app
- Admin permissions to the console to allow you to configure and update components relevant to this guide.
3 Choosing an App template
More details to follow...
4 Exploring the Stack9 Console
Before you start working in your app's console, take a look a look around to familiarise yourself with the various components; some of which you will be using in this guide.
Launch the Stack9 Console in your browser (from the following link): xxxx-console.app.stack9.dev and login with your supplied user credentials. If using single sign-on (SSO), you may need to accept your organisation policies the first time you do so.
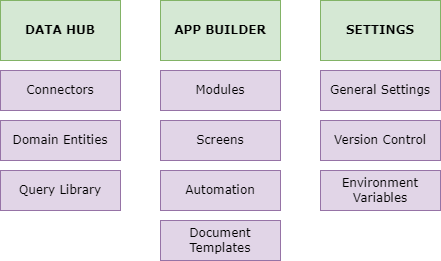
Once signed in you will see the Console home page with the following navigation options:

4.1 Data Hub
Possibly too detailed? Happy to compact these down into a single para if too detailed for this section...
4.1.1 Connectors
Connectors allow your application to communicate with a variety of internal and external data sources. Stack9 comes with a set of preconfigured connectors already installed and configured ready to use.
See Connectors Reference page for more detailed information
For this simple CRM demonstration we will focus on using the Stack9 API connector.
You can also create and configure your own connectors or have April9 develop custom connectors for almost any use case.
4.1.2 Domain Entities
This is where all the tables for your application will be kept. Think of these tables as storage folders for data created and managed within your application. Entities can be linked to each other using relational database concepts.
Stack9 comes with a default set of tables (native entities) that cannot be changed or removed but you can extend them with your own custom fields. Click here for an explanation of each native entity.
Custom entities are the tables that will make up your own domain model. This guide will take you through creating some examples.
See the Domain Model section for more detail on how to set up your domain's entities.
4.1.3 Query Library
The Query Library is a central store for all the instructions your application will need in order to Create, Read, Update and Delete data in your domain model - often referred to as CRUD operations.
It is recommended that you follow a set naming convention when creating queries. For example: get<entityname>List for queries that return a summary list of records in a table and get<entityname>Details for the full details of a specific record.
Queries can also be arranged in folders for easier management, particularly as your application grows in size.
4.2 App Builder
4.2.1 Modules
This where you will set up and manage the overall navigation and menu of your application. You can separate the areas of your application into business units, departments or by role to group similar information together.
4.2.2 Screens
Screens are the primary interface through which users of your application will interact with the underlying domain model and data contained within it.
4.2.3 Automation
The Automation section is for more advanced concepts where you can configure particular events to happen when data changes. For example, when a record is created or updated, some specified validation rules can be run to ensure required fields are included or data is captured with a valid format; such as an email address.
4.2.4 Document Templates
Data in your application can be printed or exported in a printable format. This section allows you to set up and configure templates and master templates that will be accessible from record and list menus in areas of your application that you specify.
Master templates allow you to add re-usable content that can be used in other documents templates, such as a logo and header and footer information, removing the need to maintain them in each document template.
4.3 Settings
General settings and configuration of your application... more details to follow
4.3.1 General Settings
This is where you can control the site-wide settings of your application, such as its title, logo and branding, icons and themes.
4.3.2 Version Control
Your application will grow and change over time. This section allows you to set up and control versions of your application that can be released in a staged and controlled manner. You will also be able to downgrade your application to an older version in some situations.
4.3.3 Environment Variables
Your application can be deployed to different environments for different purposes or audiences. For example, a Development (Dev) environment with limited access that you and your development team can use to start setting up or used when developing new entities, features or screens prior to release into Production. Or a UAT environment where stakeholders can test the application or any new features for acceptance prior to release.
A place to store information and keys that need to be different on each of your environments.
5 Creating your app's Domain Model
A Domain Model is central to your application's data structure. It holds a blueprint for the tables that will hold all the information and content in your app.
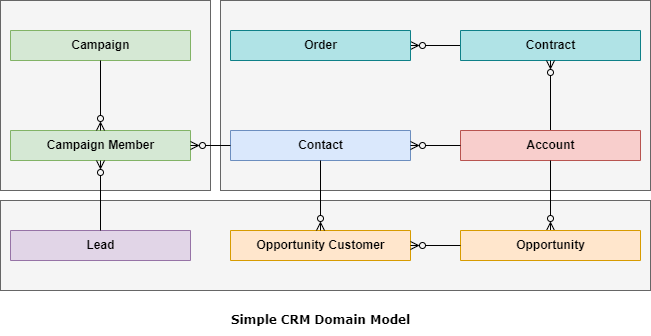
5.1 Understanding the Domain Model
The domain model is a visual representation of your app’s database. The Simple CRM domain model we're using for this guide looks as follows (too detailed - will review and simplify):

5.2 Creating an Entity to Store Information
We'll start by creating an Account (or Customer?) entity to hold information about organisations whose information and related interactions and entities the system will hold.
Your entity is now created and will be listed in the Custom folder. Next you need to add fields to the entity:
- Open the entity (or click Edit account entity after the last step above) and click the Add field button to bring up a list of field types to choose from.
- Choose Text and you will then be prompted to enter the following information:
- Name: Company Name
- Field ID: company_name - lower case with no spaces is recommended
- Placeholder: this is optional but can be used to prompt users when they capture information, e.g. Enter the business's Trading Name
- This Field is Required: Checked
- The remaining fields are optional and will be covered in other guides so you can leave them at their default values.
- Click Create
- Repeat the Add field process to create the following fields in the Account entity:
- Account No: use the Number field type (set Precision to 0 as this will be normally be a whole number)
- Status: use the Choice field type and under Values available enter the following values:
- Active
- Inactive
- Archived
- Notes: use the Rich Text field type
- You can use the Settings option to change any of the fields you have already created. You can also drag the fields to re-order them.
- Once you are done adding fields, click Save changes.
Refer to Field Types page for details of the different types of field you can add to your entity.
Next we will create a second entity to hold customer (or account) contact information:
- Choose Add Entity Model and name it Contact following the steps above.
- Then add the following Text fields to it:
- Full Name (read-only)
- First Name (required)
- Last Name (required)
- Phone
- Mobile No.
Next we will add a field that will link the contact to the an account. As an account could have many contacts, we don't want to make users enter the same information for each, so instead we will allow users to choose the account from a dropdown menu.
- Add a field using the N-1 Reference (single dropdown) field type with the following details:
- Name: Account
- Field ID: account_id (the _id suffix is important)
- Placeholder: Choose account...
- Select your entity: choose Account from the list
- Label Property: Company Name
- Click Create
- Drag the Account field to be first in the list so it will always appear at the tope of the form by default.
- Then make sure you click Save changes to update the entity.
Now that we have a contact entity linked to the account entity, we can go one step further and allow the account entity to list all contacts for the account.
- Go back to the Entity Models list and click the account entity to edit it.
- Click Add Field and choose 1-N Reference (grid).
- Enter the following information:
- Name: Contacts
- Field ID: contacts - important to use pluralised name of entity you are using here
- Select your Entity: Contact
- Foreign Key Field: account_id
- Click Create and then save the entity using the Save changes button.
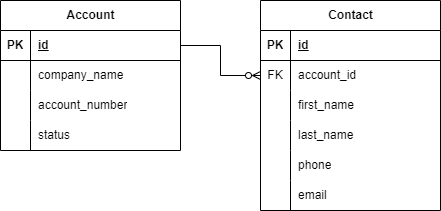
You have now created 2 simple entities that we will use in the next section: Query Library
A simple graphical representation of the entities you created will look like this:

6 Creating queries using the Query Library
Queries allow you to create instructions that send data to and from your app's underlying domain entities. To do this you will use connectors and some simple, human-readable JSON code.
6.1 Understanding connectors
Connectors allow your application to communicate with a variety of internal and external data sources. For example, the Stack9 API connector allows you to read and update information in Stack9's own SQL database. Stack9 comes with a set of preconfigured connectors already installed and configured ready to use.
We will use the Stack9 API connector as a means to connect the data you capture in your domain entities to a screen that your end-users will interact with.
6.2 Creating queries for simple CRUD operations
In this section you will create one query that will return a list of accounts and a separate one that will get the details of a specific account together with any contacts linked to it.
getAccountList
getAccountDetails
Next, create another query named getAccountDetails that will return all the details of the account together with a list of contacts linked to it:
- Use the Stack9 API connector again.
- From the Request dropdown, choose POST /account/search.
- QueryParams can be left empty.
- Use the following for the BodyParams:
{
  "$select" : [
    "company_name",
  	"account_number"account_no",
    "status",
    "notes"
  ],
  "$where": {
    	"_is_deleted" : false,
		"id":{{id}}
	},
  "$withRelated": [
  	"contact"
  ]
}
The id: {{id}} condition tells the query to return only a single account based on a variable that will be passed in.
- Click Save.
getContactList
Next, do the same for the Contact entity by creating a query called getContactList:
-
Again, use Stack9 API as the connector.
- From the Request dropdown, choose POST /contact/search.
- Use the same QueryParams as before.
-
In the BodyParams copy and paste the following JSON:
{
  "$select" : [
    "account_id",
    "account.company_name",
  	"first_name",
    "last_name",
    "phone",
    "email"
  ],
  "$where": { "_is_deleted" : false},
  "$withRelated": []
}
The account.company_name field will use the account_id field in the Contact entity to read the Company Name from the associated account.
- Click Save.
getContactDetails
Repeat the process to create a getContactDetails query using the following BodyParams:
{
  "$select" : [
    "account_id",
    "account.company_name"
    "full_name",
    "phone",
    "email"
  ],
  "$where": {
    "_is_deleted" : false,
    "id":{{id}}
  },
  "$withRelated": []
}
getContactDetailsByAccount
There is one more query we need to create. This will allow us to link up the Contacts grid field we added to the Account entity that allows us to see all the contacts in an account.
Create another query called getContactDetailsByAccount using the POST /contact/search Stack9 API request with the following BodyParams:
{
  "$select": [
    "first_name",
    "last_name",
    "phone",
    "email"
  ],
  "$where": {
    "account_id": {{id}}
  }
}
Make sure to include the {{page}} and {{limit}} values in the queryParams as before and click Save.
You now have 45 queries ready to be used in the next section.
Advanced topic: add filters to your query - maybe this should be moved to a separate section/page?
Searching and Filters
To help your users search for records, you can tag fields that will be included in the search, or add filters to your list queries. First we will add a few fields to be included when users enter a search term in the search bar on the list page.
- Edit the getAccountList query.
- In the right hand pane find the Query Search Fields section and click Manage.
- Check the box next to company_name and click OK.
Next we will add a filter that will allow you to list all accounts with one or more specific status values.
- Edit the getAccountList query
andagain. - In the right hand pane, look for the Filters section.
- Click Add Filter and
captureenter the following information:- Label:
CompanyAccount Status - Field ID:
companystatus - Query Filter Type: Array
- Field:
company_namestatus - Use sub query: (leave
uncheckedunchecked) - Filter Render: Select (multiple values)
- Data Source Type: Query distinct
- Query Library: Import from query libraries
- Query Name:
CompanyStatus - Query: getAccountList
- Sequence: 1
- Filter Section: (leave
emptyempty)
- Label:
- Make sure to Save the query.
You can add as many filters as you like. You can also group them into sections using the Filter Sections option.
7 Creating your app's User Interface
An application is of no use unless your users can interact with it through their web browser. This section covers how to create a series of simple screens that will allow users to:
- Add new accounts
- List those accounts in a table or grid
- Add a new contacts to an account
First though, we will create a module into which these screens will be added.
Next we will create a screen to list, create and update the details of Account records.
Once you have created your screen, you will need to link it to your module navigation
Repeat the process above to create another screen for Contacts using the getContactList and getContactDetails queries.
- In the Console, choose App Builder > Screens and click Create New.
- Choose Simple CRUD as the screen type and enter the following required information.
- Title: Contacts
- Key: contact
- Route: contact
- App: CRM
- Entity Key: choose Contact from the dropdown
- Next, in Grid Configuration, choose getContactList from the list of queries you added in the previous section.
- In the Columns section use Add new field to add fields for:
- Field: Account / Key: account.company_name
- Field: First Name / Key: first_name
- Field: Last Name / Key: last_name
- Field: Phone / Key: phone
- Field: Email / Key: email
- Then, in the Form Configuration section, choose getContactDetails from the list of queries you added in the previous section.
7.2 Test the application out
Need a demo site to confirm the steps below
Use the application to add a new account and then add a new contact to the account.
- Point your browser at the front-end web application at xxxx-ui.app.stack9.dev
- Click the CRM app tile and click the Accounts menu item.
- Click Create and a capture form will be displayed.
- Enter the following details:
- Company Name: Test Company A
- Account No.: 1234
- Status: Active
- Click Save.
- Repeat the process to create as many account records as you like.
Next we will create a contact:
- In the CRM app you'll see a menu option
- Go to the Contacts screen you created earlier and click Create
- Enter the following details:
- Account: Test Company A
- First Name: Joe
- Last Name: Bloggs
- Phone: 0455 555 555
- Email: test@example.com
- Note the Full Name field is empty and read-only. We'll deal with that in the next section: Automation.
8 Defining Logic using Automation
Introduction to different types of automation...
8.1 Update a field automatically
You may want a separate field in your contact records that holds a Full Name value made up from the contact's First Name and their Last Name. You could get the user to enter it manually when they create or update the record but that would be inefficient. Instead we can get the system to automatically update the Full Name field.
First we will create a query that will update the relevant record's full_name field with a concatenated value made of first_name and last_name.
Next we will use the query in an automation that will be run when a new contact record is created.
Taking it further...


